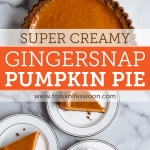
Best Gingersnap Pumpkin Pie
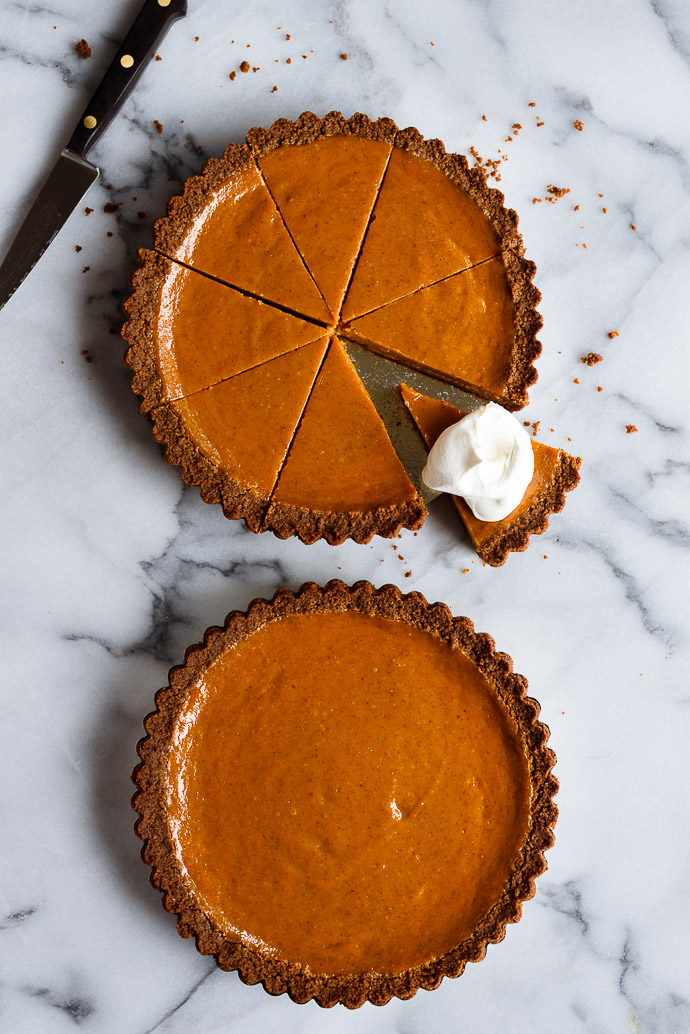
A silky smooth, boldly spiced, and super flavorful pumpkin filling and sweet and spicy gingersnap cookie crust combine to make this gingersnap pumpkin pie recipe the very best. It’s sure to become a holiday favorite for your family too! Gluten free friendly.

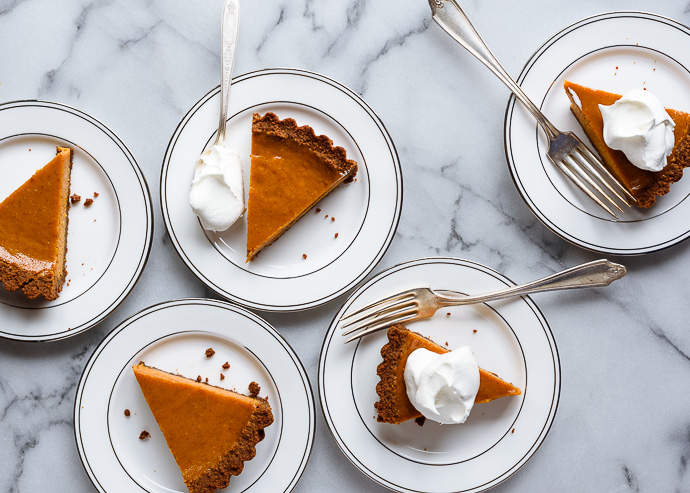
Creamy, dreamy pumpkin pie with a gingersnap crust
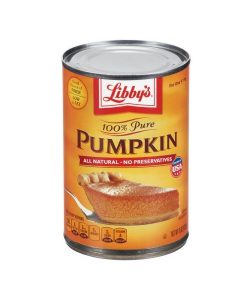
Many years ago, my Aunt Jane, then a teenager, was tasked with preparing the grand finale of the family Thanksgiving meal: the pumpkin pie. She followed the classic Libby’s pumpkin pie recipe, the one from the side of the can, but made a small mistake, accidentally substituting sweetened condensed milk for the evaporated milk called for in the recipe.
Well the pie turned out so creamy and indulgent that the mistake stuck. Since then, Thanksgiving dinner is not complete without her pumpkin pie, still made the “wrong way,” each and every year.
This pie began with Jane’s tried-and-true version of Libby’s recipe, but… I fiddled with it a bit. Okay, quite a lot. But it’s now the very best pumpkin pie a girl could ask for.
Our family is very traditionalist when it comes to our fourth Thursday in November feast: classic roasted turkey, oyster dressing, cornbread, sausage and apple dressing, candied yams, creamy mashed potatoes and my Grandma’s (and now Dad’s) out-of-this-world homemade turkey gravy, cranberry sauce and jelly, some sort of green vegetable side dish, and Mom’s famous pumpkin bread… Everyone overeats, but still leaves room for a slice of, you guessed it, pumpkin pie, with big dollops of whipped cream.
While we don’t really deviate much from this annual menu, I think there’s always room for a small amount of tinkering with the recipes themselves.
Why you’ll love this gingersnap pumpkin pie
I knew one thing for sure – the boring, plain old pie crust that accompanies almost every pumpkin pie ever, had to go. First thing. Instead, the pumpkin pie I imagined called for a fabulous, spiced gingersnap cookie crust, the perfect complement to the sweet pumpkin custard filling.
Next, while many pumpkin pie recipes call for evaporated milk or heavy cream, I kept the sweetened condensed milk from my childhood for nostalgia’s sake (but also cut back the sugar a bit), added more spice, fresh ginger, and an extra egg yolk for creaminess.
And finally, cooking the pumpkin purée with the sugar and spices prior to baking – a technique borrowed from Cook’s Illustrated – cooks off some of the natural liquid in the pumpkin, but more importantly, thickens and slightly caramelizes the custard base, deepening and intensifying the flavors of the pie. It’s key to the lusciously smooth texture of the pumpkin filling, so don’t be tempted to skip this step!
Gingersnap Pumpkin Pie Ingredients
This pumpkin pie comes together mostly with traditional ingredients, and a couple you might not expect. Here’s what you’ll need to make it:
- pumpkin: of course! If you’re buying canned pumpkin, be sure to choose pumpkin puree and not pumpkin pie filling, which is already sweetened and spiced. I typically use Libby’s but you can also make your own.
- white and brown sugar: for sweetness and caramel flavor.
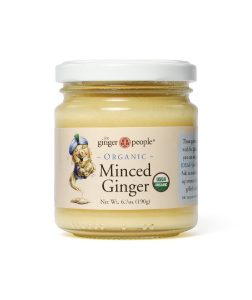
- fresh ginger: this is a generously spiced pie, and fresh ginger adds a lovely, fresh and zingy spiciness that is a welcome balance to the sweet pumpkin filling. For a more mild flavor, you can also use half as much ground ginger.
- cinnamon and cloves: cozy, warming spices for that familiar pumpkin pie flavor. You can also substitute premade pumpkin pie spice.
- salt: just a pinch to intensify the other ingredients.
- sweetened condensed milk: provides sweetness and is key to the lusciously smooth and creamy texture of this pie.
- eggs: it wouldn’t be a true custard without eggs, which provide thickening and structure. You’ll need two eggs plus a yolk for added richness.
- vanilla: just a splash of vanilla for complexity and to enhance all the other flavors. Be sure to add the vanilla last, off the heat, for the best flavor.
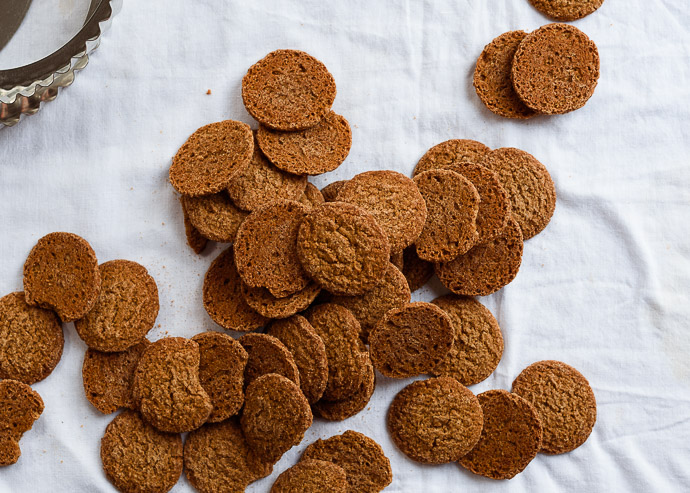
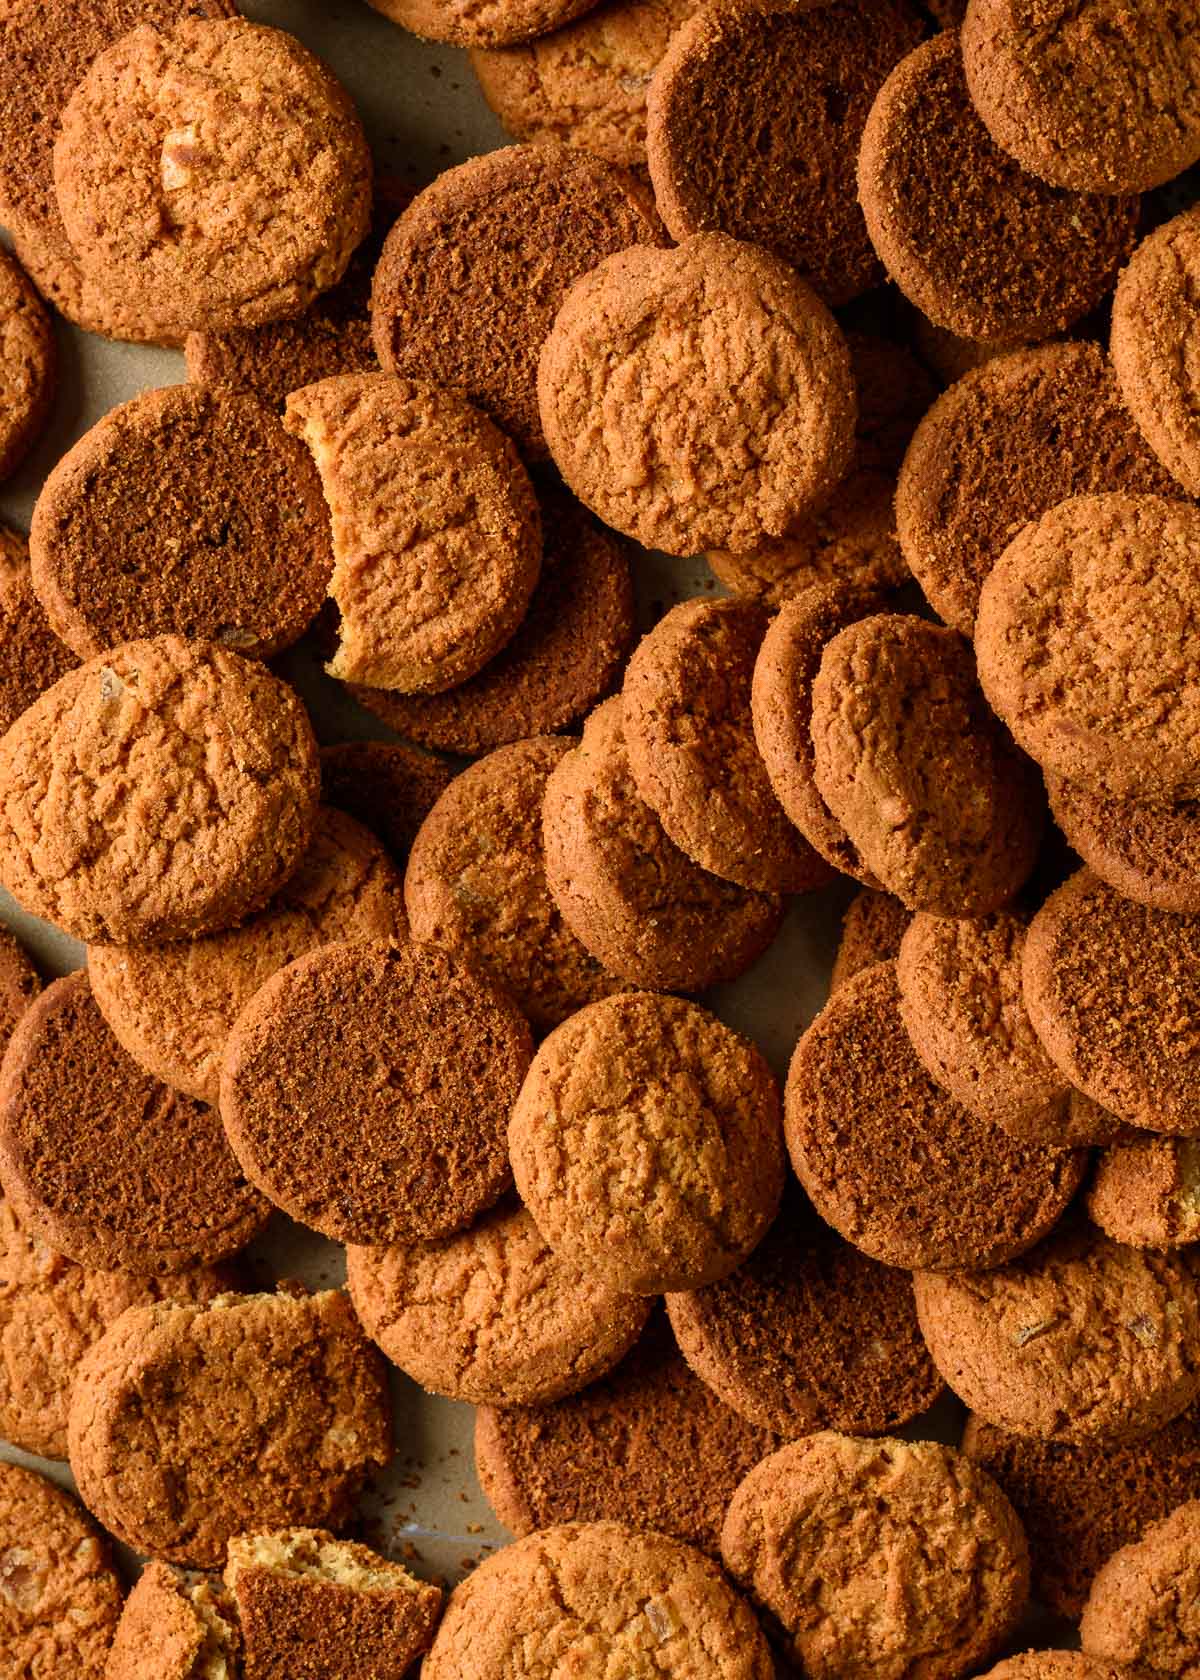
The pumpkin custard filling combines with a sweet and spicy gingersnap pie crust. It’s a twist on a classic graham cracker crust made with crisp ginger cookies, brown sugar, ginger, cinnamon, and butter that takes this pumpkin pie to a whole new level.
Find all the exact measurements and instructions in the recipe card, below.
How to make the best pumpkin pie
- Prepare the gingersnap crust: I use a food processor for this, because it’s quick and easy, but you can also mix the crumbs by hand. Bake the crust for a few minutes while preparing the pumpkin custard.
- Cook the pumpkin filling: Combine the pumpkin, sugars, and spices and cook the mixture for a few minutes. It will sputter and begin to caramelize, then become smooth and glossy as the milk, eggs, and vanilla extract are whisked in.
- Bake: Pour the filling into the prepared crust. We start at a higher baking temperature, then lower it to fully cook through, ensuring a silky, crack-free filling. Be sure not to overbake!
- Let cool: You’ll need to let your pie cool for 2-3 hours before slicing and serving with big dollops of whipped cream.
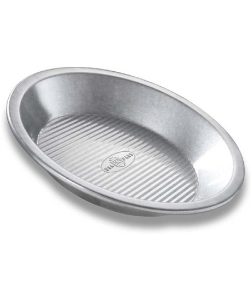
I should add, that while I designed the recipe as written below for a 9-inch pie pan, on a whim, I baked these in two shallow, 7-1/2-inch tart pans. I just love those fluted edges. So tart or pie, you decide…
And. This. Pie.
It took no less than eight iterations to get this just right, but oh, was it worth it. My final recipe has all the classic, nostalgic flavors I’ve come to expect from a Thanksgiving pumpkin pie (Jane’s original version). It’s super silky, gingery, indulgently creamy pumpkin pie perfection, and destined to become another family-favorite. Happy baking!!
Gingersnap Pumpkin Pie FAQs
I typically use Mi-Del gingersnap cookies or Trader Joe’s Triple Ginger Snaps. I have not had good luck with Nabisco Ginger Snaps. You’ll want to choose a thin, crispy cookie with lots of spicy ginger flavor to balance the sweetness of the filling.
Sweetened condensed milk will give you the silkiest, creamiest texture. The next best substitution is evaporated milk, followed by heavy cream. I do not recommend using regular milk. For a dairy free filling, use full fat coconut milk.
Don’t over-whisk the eggs. Tap the bottom of the pie pan on the counter to release air bubbles before baking. Be sure not to over bake (see below). The sweetened condensed milk, extra egg yolk, and low baking temperature also help to ensure a crack free filling!
The pie is ready to come out of the oven when the edges are set but the center of the filling still has some jiggle to it. It will continue to cook through residual heat, so it’s important not to over bake.
A bit. I usually make this pie the morning of, and the night before works too. Let the pumpkin pie cool fully then refrigerate until ready to serve.
This pie is very best the day of, but if you have leftovers, they’ll keep in the fridge for 2-3 days before things get a bit sad and soggy.
This pie can easily be made gluten free by using gluten free gingersnaps in the crust. I’ve used Mi-Del gluten free gingersnaps with success. See the recipe notes for more.
Looking for more pumpkin desserts? Try these next:
If you make this gingersnap pumpkin pie, be sure to tag me on Instagram with the hashtag #forkknifeswoon and leave a comment and rating below letting me know how you liked it! ★★★★★ Star ratings are especially helpful because they help others find my recipes too. xo, Laura

The Best Gingersnap Pumpkin Pie
- Prep Time: 20 mins
- Cook Time: 1 hour 10 mins
- Total Time: 1 hour 30 mins
- Yield: 1 9-inch pie or two 8-inch tarts 1x
- Category: Baking, Dessert
- Method: Baked
- Cuisine: American
- Diet: Vegetarian
Description
A silky smooth, boldly spiced, and super flavorful pumpkin filling and sweet and spicy gingersnap cookie crust combine to make this gingersnap pumpkin pie recipe the very best. It’s sure to become a holiday favorite for your family too!
Ingredients
Gingersnap Crust
- 2 – 2-1/2 cups gingersnap cookie crumbs ¹
- 2 Tbsp (26g) light brown sugar, packed
- 1 tsp ground ginger
- 1 tsp ground cinnamon
- 1/2 cup (113g or 1 stick) unsalted butter, melted ¹
Pumpkin Custard Filling
- 1 (15 oz) can pure pumpkin puree
- 2/3 cup (132g) granulated sugar
- 2 Tbsp (26g) light brown sugar, packed
- 2 tsp fresh minced ginger
- 1 tsp ground cinnamon
- 1/4 tsp ground cloves
- 1/2 tsp fine sea salt
- 1 (14 oz) can sweetened condensed milk
- 2 large eggs
- 1 large egg yolk
- 1/2 tsp pure vanilla extract
Instructions
Gingersnap Crust
- See recipe notes below for gingersnap crust tips and troubleshooting.
- Preheat the oven to 350℉. In a food processor, pulse together the gingersnap cookies and brown sugar until you have a coarse crumb.
- Add the ginger and cinnamon and pulse once or twice to combine. Pour in the melted butter ¹ and pulse until combined.
- Spoon the crumbs into a ungreased 9-inch pie pan,² or two 7-1/2-inch tart pans (with removable bottoms) and use your fingers to gently divide the mixture into an even layer on the bottom and sides of the pan. Follow with the flat bottom of a measuring cup or glass to firmly pack the crust into the pan.
- Bake for 5-8 minutes, then remove from the oven and let cool for at least 10 minutes.
Pumpkin Pie Filling
- Heat the pumpkin, sugars, ginger, cinnamon, cloves and salt in a large heavy-bottomed pot over medium-heat, until the mixture begins to sputter. Cook for 5 minutes, stirring regularly, until smooth and glossy.
- Remove from the heat and slowly stir in the condensed milk, whisking until completely combined. Whisk in the eggs and egg yolk, one at a time, whisking until completely combined after each addition.
- Stir in the vanilla. Pour the filling into the pie shell(s).
- Bake for 30 minutes at 350℉, until the edges of the filling are just starting to set.
- Turn the oven down to 325℉, and bake for another 25-35 minutes, until the filling is mostly set (the center will still be slightly jiggly). Cover just the crust with aluminum foil or a pie crust shield, as needed, if the crust starts to brown too quickly. The filling may bubble and puff up slightly as it cooks – that’s okay, it will settle as it cools.
- Remove from the oven and let cool for 2-3 hours until completely set. The pie filling will continue cooking through residual heat.
- Garnish with fresh whipped cream and serve chilled or at room-temperature. Best eaten the day of, but the pie can be made in advance and will keep for 2-3 days in the refrigerator. Enjoy!!
Notes
- ¹ Graham cracker/cookie crusts are a challenge to write recipes for, and I’ve gotten many questions over the years about this. There are a lot of variables – the brand of cookie, how finely you crush/crumble them, how firmly you pack the crumbs into the measuring cup, the density/sugar/moisture contents of your cookies. Even the humidity in your kitchen can come into play. All these different factors demand different amounts of butter to moisten/hold together the crumbs without becoming greasy. This recipe was originally tested with MI-DEL gingersnaps (10oz or about 45-50 cookies), but I’ve used other brands with success. This is the ratio that works for me, but use your best judgment.
- A few tips: the cookies should be crumbled to the point of resembling coarse sand. You don’t want to pulverize them completely into powder. Pulsing in a food processor works well. Don’t worry if there are a few larger bits of cookie here and there. You’ll end up with about 2 to 2-1/2 cups of crumbs.
- Because there are so many different brands of gingersnap cookies, use your judgment when it comes to the butter/crushed cookie ratio. 1/2 cup (1 stick) of melted butter may be more than you need depending on the particular gingersnaps you use. Start by adding about 6 Tbsp of the melted butter to the crumbs. If they aren’t coming together or don’t seem damp enough, add a little more butter. If they seem excessively buttery, add more crumbs, and so on. You want a crumbly, moist crumb that can easily press into the tart pan.
- Bake the crust(s) on top of a rimmed sheet pan to catch any butter drips. This is especially important if you’re using tart pans with removable bottoms. Depending on the cookies you use (and your oven), the crust may take more or less time to pre-bake. Crispier cookies may bake (and potentially burn) faster than softer varieties. If in doubt, err on the side of less time in the oven. The crust will continue to bake when you add the filling. Cover the pie (or just the crust) with aluminum foil if it seems like it is browning too quickly.
- If your gingersnaps are very sweet, you can reduce or omit the brown sugar in the crust. This pie is best with a strongly spiced ginger cookie crust.
- For gluten free pumpkin pie: Simply use gluten free gingersnap cookies such as these from MiDel. Note that they are 8 oz bags instead of 10 oz and will yield about 2 cups of cookie crumbs, so you may need a bit less butter. Several readers have also had good results with the gluten free gingersnap cookies from Trader Joe’s.
- Substitutions for sweetened condensed milk: You’ll get the best flavor and texture using sweetened condensed milk, but if you’d prefer a less sweet pie, you can also use 1 cup of evaporated milk, heavy cream, or full fat coconut milk.
- ² Make sure you are using a 9-inch pie pan that is deep dish, or at least 2″ tall, with a minimum volume of 5-1/2 cups. If that’s not feasible, you can also divide the pie into two smaller pans (reducing the baking time), or bake any extra filling in a couple of small oven-safe ramekins.
Keywords: gingersnap pumpkin pie, pumpkin pie, cookie crust, brown sugar, creamy, gluten free, best,
Originally published November 21, 2014. Updated with recipe notes and baking tips.
Made this last year for the first time. It is now my absolute favorite. Such a favorite, I’m taking the recipe with me to make it at my father-in-law’s house so that he can experience it as well!
★★★★★
Thanks so much, Sandy!! Hope he loves it too 🙂
Does anyone have any suggestions on how to avoid significant crust puffing? We love this pie but this happens every time and I’m not sure what I’m doing wrong!
Hi Aimee! Are you having trouble with the crust puffing up during the prebake or once the filling has been added?
Thanks for answering! It is happening after the filling has been added. It looks perfect after the prebake! Thanks!
What is the trick for this? I had the same problem last year and want to attempt this recipe again.
I haven’t had much of a problem with this, but my best advice would be to make sure the crust is firmly pressed into the pan before blind baking (you can also carefully press it down again while still warm if it’s puffed up before you add the filling). I’m wondering if the type of gingersnaps might have something to do with it? My favorite are the triple gingersnap cookies from Trader Joe’s (they come in a round tub), but also use Mi-Del. You could also try covering just the crust with a pie ring/aluminum foil which may help. I would maybe wait until the filling is just beginning to set first. Other than that, just make sure that your oven is really the temperature it says it is. I have a little oven thermometer inside to check mine. Hope that helps, and let me know if you have any other questions! Happy baking!!
My go to pumpkin pie recipe has always been the America Test Kitchen recipe, which is good, but takes forever to make. I was looking for a simpler recipe yesterday to make something traditionally American for my Danish in-laws and came across this recipe. I thought I would miss the traditional pie crust but this was better and took way less time! I’m in Germany and substituted Biscoff cookies for the ginger snaps and omitted the sugar in the crust and it was perfect, also substituted maple syrup for the brown sugar in the filling and the confectioner’s sugar in the whipped cream and that also worked nicely. I never leave comments on recipes but I’m not much of a baker and this was maybe the most successful thing I’ve made, so thanks!
★★★★★
I’m thrilled to hear I’ve converted you to my recipe! 🙂 And using Biscoff cookies sounds AMAZING. Happy baking!!
Thank you for these suggestions – I’ll give them a try!
How should I adjust the baking time if I make this as Mini pumpkin pies in a muffin tin?
Hi! I haven’t tried this, but they definitely won’t take nearly as long to bake. Without having tested this myself, I would start with baking the crust just 3-5 minutes, and the filling 10-20 minutes total. You’ll need to watch the mini pies super carefully to make sure they don’t over bake. Look for the edges to set and gently puff up, and the center should stay just a tiny bit jiggly. Also, stay posted, because I’m working on pumpkin pie bars based on this recipe. Hope that helps! And I’d love to know what ends up working for you!
Is it ok to use one 12in tart pan?
Hi! Absolutely, the tart may end up thinner, so may take less time in the oven. Just be sure to check it often once you turn the oven down to make sure it doesn’t over bake. Enjoy!!
This sounds so great. Making it tomorrow for Christmas dinner. I have a question about the fresh ginger that is crushed in the filling. Do you remove that after heating up the pumpkin? Or is there a way to crush it so there isn’t a hunk of it? Maybe grate it?
Let me know. Thank you
★★★★★
I found the answer below. Thank you for sharing.
★★★★
Hi Cathy! Please let me know if you have any other questions! Merry Christmas and happy baking! ☺️
This was UNBELIEVABLE!!! This will absolutely be my go to recipe now! The texture, the gingery goodness, holy yum! Thanks!!!
I made the crust recipe this year to go with my egg-less pumpkin pie and while the crust did burn a little, it was still very delicious. No complaints in my house! The brand of cookie I used was Ginger Snaps, by Nabisco. I pulsed 50 cookies (or so) in the food processor and ended up with about 2 1/2 cups of crumb + spices and 1/2 stick butter. Only cooked it 5 minutes at 350. No butter pooling. No crust puffing. What I will do differently next time is use the whole box of cookies for the crust because the crumb mixture did not fill the sides of the round 9″ pie pan I used – even though I pressed it with the bottom of a measuring cup (great tip, BTW). Thank you!
Was online looking for a gingersnap crust recipe and came across this. First, I loved the story about how the recipe changed by mistake (usually the best way) and then I tried it. SO good. Am just having it again for breakfast (shhh, don’t tell anyone). This is going in to my recipe book. Thanks very much and happy thanksgiving…
★★★★★
Holy sugar bomb! I followed the recipe exactly as written and it was waaaayyy too sweet for me. The sweetness of the cookie crust plus the sugar from the sweetened milk plus extra sugar was just overload. The texture was great, though. I cooked the filling and then blended in the milk and eggs with an immersion blender. I will definitely do that again, but cut down on the added sugar and probably go back to regular evaporated milk.
★★★
Hi, the crust keeps puffing up, what can I do to fix this?
I wanted to try this recipe for Thanksgiving this year but I found a premade gingersnap crust would that work for this recipe ?
Hi Patricia! Yes, this should work with a premade crust. You won’t need to pre bake it, and I would just watch it while the pie is baking to make sure it doesn’t brown too quickly (cover with foil if needed). Happy thanksgiving!!
On the hook for a pie this year and since the flavor of this was so awesome last time I did it this one is back :). One question from a novice that may seem silly but…. When it comes to the crushed ginger in the filling, how do you remove it after cooking. I failed miserably the last time and a few people ended up with a chunk of ginger. I have a larger mesh strainer this time but I’m sure I’m missing something obvious.
Hi Jay! I’m so happy to hear you loved this pie last year 🙂 Now, tell me what your ginger looks like, because I think we’ve got a miscommunication here somewhere! The crushed ginger should be very finely minced, almost like a paste, that mixes in well with the filling – you shouldn’t end up with large pieces or need to strain it out. You can buy it in a jar already crushed (usually in the produce dept or Asian section of the grocery store) or you can take peeled, fresh ginger, mince it finely, and use the side of a large knife or tool to smash the ginger into a cutting board. I’m lazy so I usually go the jar route (it’s easier to scoop out exactly how much you need that way too) and it lasts forever in the fridge. Hope that helps and please let me know if you have any other questions!! Happy baking!
Perfect, I will pick some up today. And yes when I saw crushed ginger I just googled and ended up with an explanation of ; grate, crush with spoon or glass to give a bigger surface area. So I figured it was kind of steeping in the filling. -.- Like I said missing the obvious.
Not at all! I think you could use one large chunk of smashed ginger (that you did remove before baking), and steep it in the filling, but you’ll probably get more flavor out of the crushed/minced. The jarred stuff is so handy. Have a great thanksgiving!!
THanks, Laura. ARe you suggesting using the bottled, crushed ginger rather than powdered? also, i wanted to try to add bourbon to this? any thoughts about how that will affect the baking time and how much booze can be added to the recipe?
Hi! I like to add fresh ginger instead of dried/powdered, but that will work too. You can either grate it by hand and then crush it finely, or go the easy route and just buy the fresh pre-crushed ginger paste in a jar or tube (which is what I do). I haven’t tested this recipe with bourbon but you could certainly replace the vanilla with bourbon, and I’m guessing you could add at least another Tbsp in addition to that without affecting the baking time. Beyond that, I’m not sure! Hope that helps 🙂
A microplane works great for grating peeled fresh
ginger.
Hi Laura,
Your recipe sounds yummy and I can’t wait to try it and let you know how it comes out.. How did you make such a beautiful scallop edge on the cookie crust! very pretty!
Hi Donna! The tart pans I use have a fluted edge, which makes it very easy 🙂 hope you enjoy!!
I used 50 Trader Joe’s triple giner snap cookies for the crust, with just a smide less than one stick of butter. It did not fill the sides of my 9 in glass pyrex pie pan fully. The only thing I can think is that maybe I didn’t press it thin enough, though I did use a measuring cup to flatten the bottom and press up the sides? The crust baked ok, but pooled some butter around the inner edge. The short sides of the pie left me with over a cup of filling left over, so I whipped up half a batch more of crust (way too buttery when halved) and baked in 5 muffin pan spots. They puffed way up and pooled a TON of butter, so I tried to soak up with a paper towel and reshape as they cooled. I filled with the remaining filling and baked about 5 minutes at 350 with the pie and then 15 minutes at 325. The pie was definitely set and the edges of the crust were getting a little too dark 🙁 and the mini pies were set. I think this needs a little fine tuning. Can you recommend a specific brand and quantity of gingersnaps that you use for a pie pan? I can tell already it’s going to be yummy, but I need to get the prep figured out before Thanksgiving.
Hi Alison! Sorry to hear the recipe is giving you trouble. It sounds like the cookie crumb/butter ratio was off for you. I’ve updated the recipe notes (above) to address this – unlike graham crackers which are more consistent, gingersnaps seem to vary a ton by brand. I tested the recipe originally with Mi-Del gingersnaps, but have used other brands as well. You’ll want to end up with at least 2 cups of crumbs. I haven’t had the issue of the crust puffing up significantly, but I might try popping it in the fridge for a few minutes first, and only pre-baking it for five minutes instead of the full eight. I’d also cover the crust once you add the filling if it’s browning too quickly. Hope that helps! Let me know if you have any other questions 🙂
Hey thanks for getting back! The minis actually turned out decent; the large definitely had an overdone crust. I think like you said my crumb:butter ratio was off. I’ll consult your updates before my next attempt!hel
★★★★
Best pumpkin pie I’ve ever had. I thought it was going to be really difficult to make, but it was great and seriously the best.
This is going to be my permanent Pumpkin Pie recipe ! I make pumpkin pie every year and was told this was hands down best one I have made yet. It’s a keeper. Thanks for the recipe!
★★★★★
I made this pie on Thursday and it was fabulous. Best pumpkin pie I’ve ever made and best pumpkin pie I’ve ever tasted. I used two fresh pie pumpkins and convection roasted them until they started to brown so there was very little moisture when I pureed them. I used the walnut pie crust recipe from food.com for more texture and interest. The combination was fantastic. Next time I would cut back on the sugar just a touch. Please thank Aunt Jane for me and for my Thanksgiving guests. We loved the pie!
★★★★★
I made this pie for Thanksgiving this year and it was fantastic! It even got my mother’s seal of approval! (No easy feat, I can assure you!) Super delicious pumpkin pie! 🙂
Thank you for this recipe. I made it for Thanksgiving dinner today and it was a smashing hit! Kids and adults loved it, even though I forgot to add vanilla. 😂💕 I am trying to give it 5 stars, but for some reason I can’t click them.