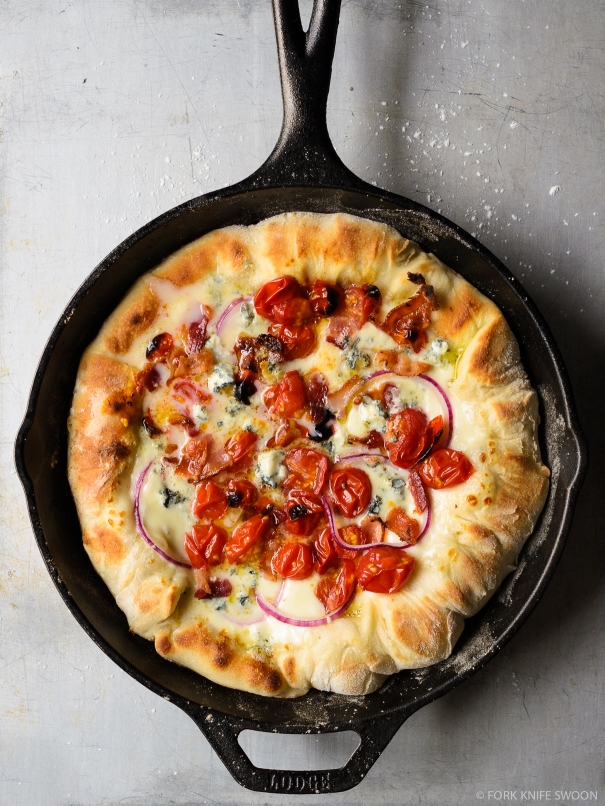
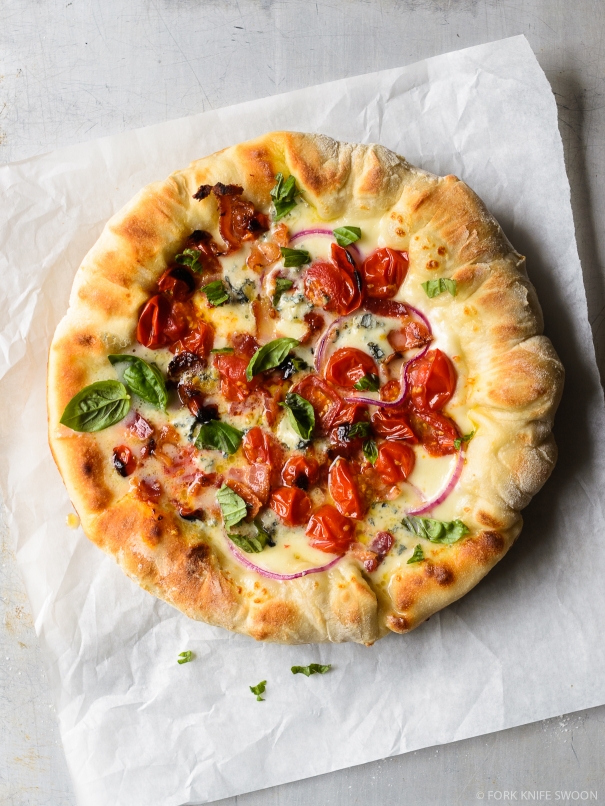
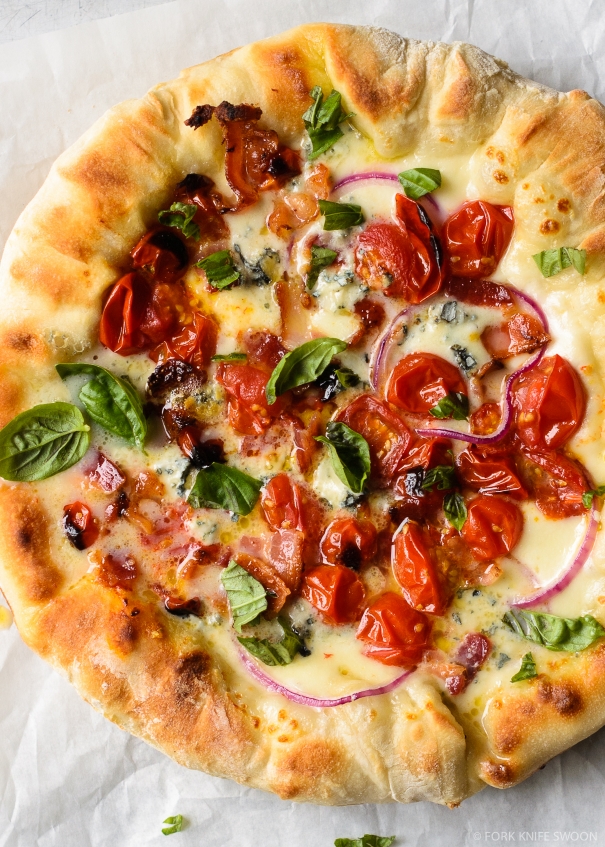
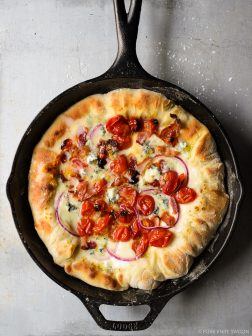
Tomato, Bacon and Blue Cheese Skillet Pizza
Have you heard of skillet pizza? I know I’m woefully late to this (pizza) party, but after being tempted by this (and this, and this) floating around the web, I finally gave in to my curiosity.
The cooking method consists of baking the pizza under a broiler in a pre-heated, super hot, cast-iron skillet. It only takes a couple of minutes for the pizza to cook and the crust to bubble up – becoming wonderfully charred and crispy – resulting in a pizza very similar to a brick-oven baked pizza.
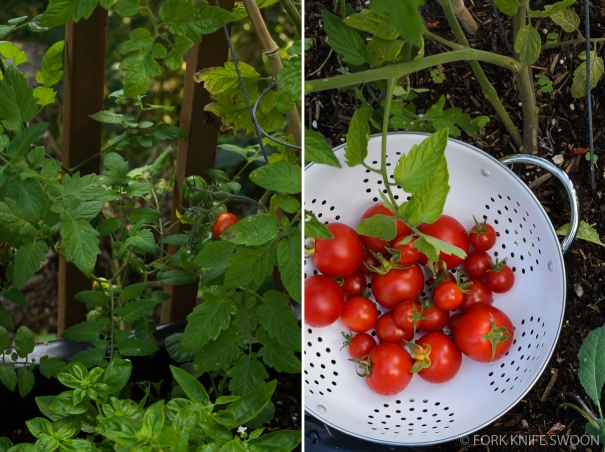
We’re still swimming in homegrown tomatoes, so I started with those as a base for the toppings, quickly roasting them first for added flavor. The rest of the toppings fell into place easily – creamy, fresh mozzarella, offset by tangy, sharp blue cheese crumbles and crisp red onion slices.
And… bacon. I couldn’t resist that tomato-bacon-blue cheese combination, which is so good atop this crispy, chewy, slightly charred crust.
Now, the skillet pizza method does result in pretty darn great pizza. It definitely produces a crispier crust than can often be achieved in a home oven, even with a pizza stone. I will say though, that this method takes some finessing.
A few key skillet pizza strategies (through much trial and error):
- A typical pizza dough recipe (or fresh, store-bought dough) yields a 1-lb ball of dough. This will make two skillet pizzas, if you have a standard 8-inch or 9-inch cast iron skillet. For this recipe, I used Trader Joe’s fresh pizza dough, and divided it in half as soon as I took it out of the fridge to rest. If you’re using homemade dough, divide the dough prior to rising.
- Be sure to roll the dough out no larger than the skillet. The dough transfer (from pizza peel to hot skillet) is the trickiest step in the process. Sizing the dough accordingly assures that step goes smoothly.
- Get your skillet really hot. Almost dangerously hot. But be careful! The hotter the skillet, the crispier the bottom of your pizza crust.
- Have all of the toppings completely, 100% ready to go before you start cooking. You should be able to top the pizza in less than a minute.
- The original Atlantic recipe calls for all the toppings to be added prior to placing the uncooked pizza in the skillet. I found it was advantageous to add them once the dough was in the skillet. This made the transfer easier, and also ensures that the crust will be cooked all the way through, without doughy bits inside.
- Practice makes perfect. Once you master that dough transfer… it’s all downhill from there.
I’d love to know your favorite pizza-making methods!
Tomato, Bacon and Blue Cheese Skillet Pizza
- Prep Time: 20 mins
- Cook Time: 10 mins
- Total Time: 30 mins
- Yield: 2 9-inch Pizzas
Ingredients
- 1 (1 lb) ball of pizza dough, divided*
- 1-1/2 cups cherry or grape tomatoes, halved
- 2 tbsp olive oil, plus more for the tomatoes
- 2 tsp fresh garlic
- 6-8 strips of bacon
- Half of a red onion, thinly sliced
- 8 oz fresh mozzarella, thinly sliced or grated
- 2/3 cup blue cheese, crumbled
- A few splashes of good-quality balsamic vinegar, for serving
- Small handful of fresh basil leaves, for serving
Instructions
- Remove the dough from the fridge, and place on a lightly-floured pizza peel (or cutting board etc.) about 30 minutes before you plan to bake the pizzas.
- Cook the bacon in a large skillet over medium heat, until cooked but not too crispy. The bacon will continue to cook on the pizza. Remove the bacon and place on a paper-towel lined plate to drain. When the bacon is cool enough to handle, crumble into small pieces.
- In a conventional oven, place an oven rack on the highest level directly under the broiler, and turn the broiler to high.
- Cut the cherry tomatoes in half, drizzle with a few teaspoons of olive oil, and spread out in an even layer on a non-stick sheet pan. Broil for 8-10 minutes, until the tomatoes start to blister and crinkle. Remove from the oven and set aside. Keep the broiler on.
- While the tomatoes are cooking, heat a dry 9-inch cast-iron skillet over medium-high heat for 10 minutes. If the skillet begins to smoke, turn the heat down, but the goal is to get the skillet really hot.
- Meanwhile, stir together the olive oil and garlic in a small bowl, and set aside. Slice the onion and mozzarella, the thinner the better, and crumble the blue cheese. Set aside. All the toppings should be completely ready to go as soon as the pizza dough hits the skillet.
- Gently roll or pull the dough ball(s) into 9-inches circles, about the size of the skillet. Use a pastry brush or the back of a spoon to brush on the garlic olive oil, leaving a 1-inch border around the edge.
- At this point, the cast-iron skillet should be super hot! Carefully slide one of the pizza doughs into the skillet (still on the burner), and immediately top with the mozzarella. The bottom of the dough will begin to cook. Add the tomatoes (reserving juice), red onion slices, bacon crumbles, and blue cheese crumbles, taking no more than about 30 seconds.
- Transfer the skillet to the oven, and place under the broiler with the handle facing to the right. Broil for 1 minute, then (using a heavy-duty potholder) turn the skillet 180 degrees, so that the handle is completely to the left. Broil for another minute or two, until the cheese is melted and the pizza crust is puffy and golden. If bits of the crust begin to blacken and char, that is okay.
- Remove from the oven and let sit in the skillet for a few minutes. Carefully remove from the skillet, top with fresh basil and/or a drizzle of balsamic vinegar, slice and serve immediately. If you’re making two pizzas, (carefully!) wipe out the skillet and begin the process again with the second ball of dough and remaining half of the toppings.
Pingback: Healthy Chocolate Truffles
Just tried this pizza for the first time tonight. It is delish! Thank you, Laura, for sharing the recipe. I did have some trouble with the crust though. I followed your directions exactly (using Trader Joes pizza dough) but the bottom of the crust was burned completely rather than chared. I then tried turning down the stove to medium high heat but the pizza didn’t cook enough and it still burned the bottom of the crust completely. I’ve had brick oven pizza in the past and love the slightly charred taste but my pizza’s crust tasted a bit like charcoal because it was badly burned. Any suggestions as to how I might fix this problem? Instead of letting the dough sit for 30 minutes, should I put it in the pan when it’s still cold from being in the refrigerator?
Thanks for your help!
Oh no! I’m so sorry your bottom crust burned! I’m not sure the issue is the dough resting (I pull my dough out 30 mins before it goes in the skillet, just like the recipe). Did the bottom crust burn before it even went in the oven? Or was it when you pulled it out at the end?
Gosh this looks so so delicious!! I just had a take out pizza for dinner! I wish I had this one instead!
Thanks, Ami!
Thanks, Rachel! We are still overflowing with tomatoes and our season is supposed to be almost over!
This sounds like a pretty perfect pizza! I love the idea of getting an extra crispy crust as I never seem to be able to achieve this in my oven. 🙂
Thanks, Helen!
This pizza looks fabulous!!
Thank you, Marla!
Wow what a cool idea! My buddy built a wood fired oven in his backyard last summer and he pumps out these ridiculously awesome pizzas… now maybe I can compete with his amazingness! Thanks for this awesome tip 🙂 Pinned!
Thanks, Chris! My uncle has a brick wood fire pizza oven in his backyard, which yields some INCREDIBLE pizzas. I’m not sure anything quite competes with that, but this method gets pretty close for a home oven… 🙂
I love skillet pizzas and yours is just gorgeous. I use a small, countertop convection oven so my method is to cook the pizzas in a skillet, but on the stovetop. I then add the ingredients and bake in the oven. Thanks for the great tips!
Thanks, Heather! That method sounds yummy too 🙂
A pizza baked in a skillet – I love it! Gonna jump on that bandwagon asap.
You should definitely try it! 🙂
Mmmm what a wonderful way to use up the rest of your summer tomatoes, I can’t think of a more delicious flavor combination than this!
Thank you, Nicole!!
Thank you for another GREAT thing to try out as soon as the weather cools. When it is hot, we grill everything we can, including pizza, outside.
Thank you, Lydia! Can you believe I’ve never tried grilling pizza? I’ve had that on my culinary bucket list for way too long… Might have a go at that before the weather gets too chilly!
This looks SO GOOD! I am also super (fashionably?) late to the skillet pizza party – but I think this might be just the kick I needed to give it a whirl.
Thanks, Jessie! Yes, definitely fashionably 🙂